How to Create a Low Poly Tree in Cinema 4D

Follow this tutorial step-by-step to create a low poly tree model that you can use in video games, graphic design and illustration projects whilst learning Cinema 4D quickly.
Some of the skills you'll learn in this tutorial include creating basic 3D shapes, extrusion techniques, basic rendering techniques and how to colour 3D objects.
1. How to Create a Cube
Step 1
Open Cinema 4D and take a look at the top menu bar of the screen. You'll find almost all the tools that you will need to create the floating island.
Select a new project in Cinema 4D and enter Perspective Mode by selecting it with the mouse.

Step 2
Navigate the mouse to the top of the screen and click on the Add Cube Object button in the top menu bar.
Primary-Click and Hold on the blue Add Cube Object button. This reveals a sub menu where you can click to create more objects. This will come in handy later on in the project. Create the Cube tool by clicking on it.

Step 3
Make sure that the cube is selected and then click on the Make Editable button in the menu bar on the left of the screen.

2. How to Extrude Polygons from a Cube
Step 1
Select the Polygons button on the left side of the screen. This allows you to select the polygons on the cube.

Step 2
Click the polygon that you would like to extrude. The polygon will appear highlighted in yellow. Hold the Control Button on the keyboard and use the mouse to hover over the direction you want to move the polygons to. For this example we will use the y axis (green arrow).
The mouse cursor should change shape, indicating that you can move the polygons. Whilst holding the Control Button, click and drag the arrow to extrude the polygons.

Step 3
Choose from any of the polygons sides in order to extrude the object to the shape that you want.

3. How to create the Tree Trunk
Step 1
Use the Scale Tool to create a tapered look to the tree trunk. Make sure to select the top polygon first using the Polygons button.

Step 2
Click and drag the axis using the scale tool to taper the top of the cube.

Step 3
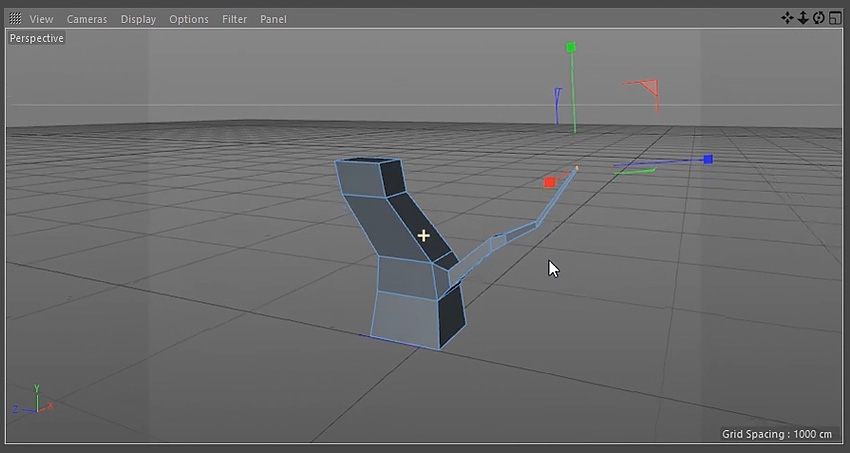
Extrude the polygons and use the Move Tool to change the direction of the tree trunk to give it an interesting shape.

Step 4
Remember to taper the top polygon by using the Scale Tool.

Step 5
Repeat the previous steps a few more times, using the Scale Tool and the Move Tool, until you are happy with the shape of the tree trunk.

4. How to create Tree Branches
Step 1
To create the branches select the polygon for it's point of origin using the Polygons button.
Once you have a polygon selected, secondary-click the mouse to bring up a menu and select Bevel from the list of options.

Step 2
Click and drag on the selected polygon until you are happy with the shape of the bevel.

Step 3
Use the Move Tool to extrude the branch out. Hold the Control Button on the keyboard whilst using the mouse to click and drag the selected polygon.

Step 4
Taper the branch using the same techniques used to taper the tree trunk. Play around using the Move Tool and the Scale Tool to get the best results.

Step 5
Keep extruding and tapering the branch out until you are happy with the overall shape. Remember to use the Move Tool to send the branch out into different directions.
Step 6
Choose another polygon on the branch and extrude another shape out.

Step 7
Repeat the steps above to create a second and third branch. Make sure to view the tree from different angles in the viewport. This will give you the most interesting shapes for the tree.


5. How to create Low Poly Leaves
Step 1
Navigate to the top menu and click and hold on the Cube Button. This reveals a menu with options to create more shapes. Select the Sphere. This will spawn a sphere in the scene.

Step 2
Navigate to the top menu and click and hold the Bend Button. This will reveal another set of options. Select Polygon Reduction.

Step 3
Drag the Polygon Reduction into the Sphere. This will reduce the amount of polygons in the sphere.

Step 4
Make sure Polygon Reduction is still selected. In the bottom window change the Reduction Strength until you are satisfied with the results.

Step 5
Navigate to the top menu and click and hold the Bend Button again. This reveals another set of options. This time select Displacer.

Step 6
Drag the Displacer into the Sphere. This changes the shape of the sphere and add more options.

Step 7
With the Displacer still selected, navigate to the bottom of the screen where the Displacer options are located. Select the Shading tab and click the arrow button next to Shader. Select Noise from the drop down menu.

Step 8
Select the Object tab and adjust the Height until you are happy with the way the sphere looks.

Step 9
Select the Sphere then select the Scale Tool. Make sure that the Model button is selected and use the Scale Tool to adjust the shape of the sphere until you are happy with it's shape.

Step 10
Use the Move Tool to position the sphere correctly on the tree. Using all four views in the viewport can help with this. To do this, click on the middle button on the mouse.

Step 11
Duplicate the Sphere by holding the Control Button and clicking and dragging the Sphere Object.

Step 12
Move the new sphere to another position on the tree using the Move Tool. Adjust the look of the new sphere by selecting the Displacer and using the options as outlined in the previous steps.

Step 13
Continue to duplicate and position new spheres to create a look that you are happy with.

Step 14
Repeat the steps to create leaves for the other branches of the tree.

6. How to Group Objects
Step 1
Select all the Sphere Objects that belong to a group of leaves. Group objects by holding the Shift Key on the keyboard and selecting objects with the mouse.

Step 2
With the objects selected press Alt-N to create a new group.

Step 3
Use the mouse to select the Null Group and rename the group with a suitable name.

Step 4
Repeat the steps for each sphere group.

7. How to Colour Objects
Step 1
At the bottom of the screen click on the Create Button and select New Material.

Step 2
Double click on the Material and a new window will appear. Untick Reflectance.

Step 3
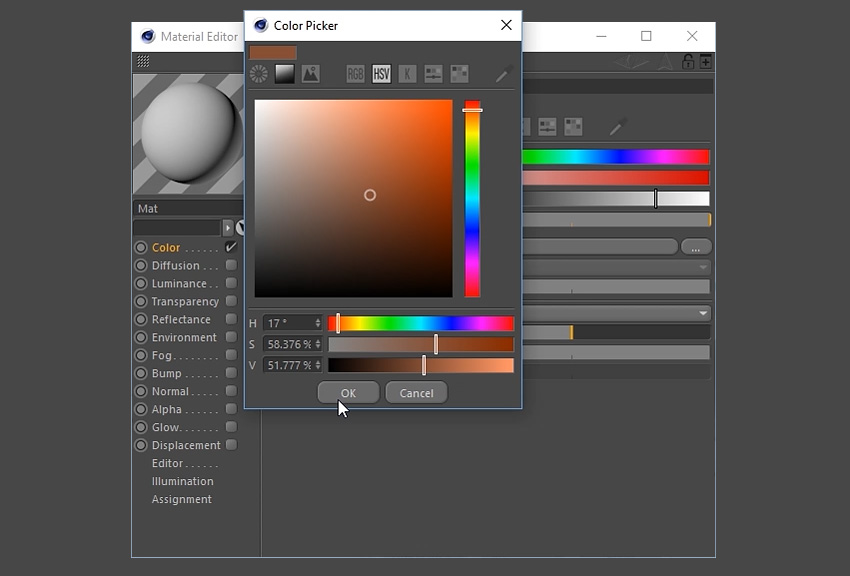
Select Colour and double click on the box at the top of the window.

Step 4
Select a suitable colour for the tree trunk and then click the OK button.
Step 5
Apply the material to the tree trunk by clicking and dragging it to the object using the mouse.

Step 6
Repeat the steps to create several different coloured materials for the leaves.

Step 7
Apply the materials to the grouped objects.

8. How to add Light to the Scene
Step 1
Choose a suitable angle in the viewport by navigating around the scene. Click on the Camera button at the top to create a camera.

Step 2
To set up the basic lighting, you’ll want to go to the Floor button located in the top menu bar. Left Click-Hold and then select Physical Sky from the menu.

Step 3
Ensuring that Physical Sky is selected in the menu on the right, a new menu will appear on the bottom right of the screen. Select the Time and Location tab and choose a time using the left and right arrow keys. This will change the lighting of the scene. Choose a suitable time to light up the scene.

Step 4
To add additional lighting to the scene, select the Add Light button in the top menu bar at the top of the screen.

Step 5
This will create a Light Object which you can move around the scene. Move the light object using the Move Tool to a suitable position.

Step 6
To customise the lighting further, experiment with the light object options in the bottom right of the screen. Here you can adjust the Intensity, Light Type and even Colour.

9. How to Render the Scene
Step 1
Click on the Render Settings button on the top menu bar.

Step 2
Choose the resolution, height and width of the image. This tutorial uses the settings 1920x1200 72dpi.

Step 3
Choose where you'd like to save the file and the file name. You may wish to tick Alpha Channel on, if you want to continue editing the image in another program such as Adobe Photoshop.

Step 4
Go to the Effect button at the bottom left and select both Ambient Occlusion and Global Illumination from the drop down menu. This will add these options to the render.

Step 5
Click the Render button and wait for the render to finish.

Conclusion
And with that, the 3D Low Poly Tree is complete. Feel free to share the own creations below. Explore different camera angles, lighting set ups and colours to find out what works best for the illustration.
You can also export the image to Adobe Photoshop to enhance it further or to use it as part of a larger scene or illustration.


Post a Comment